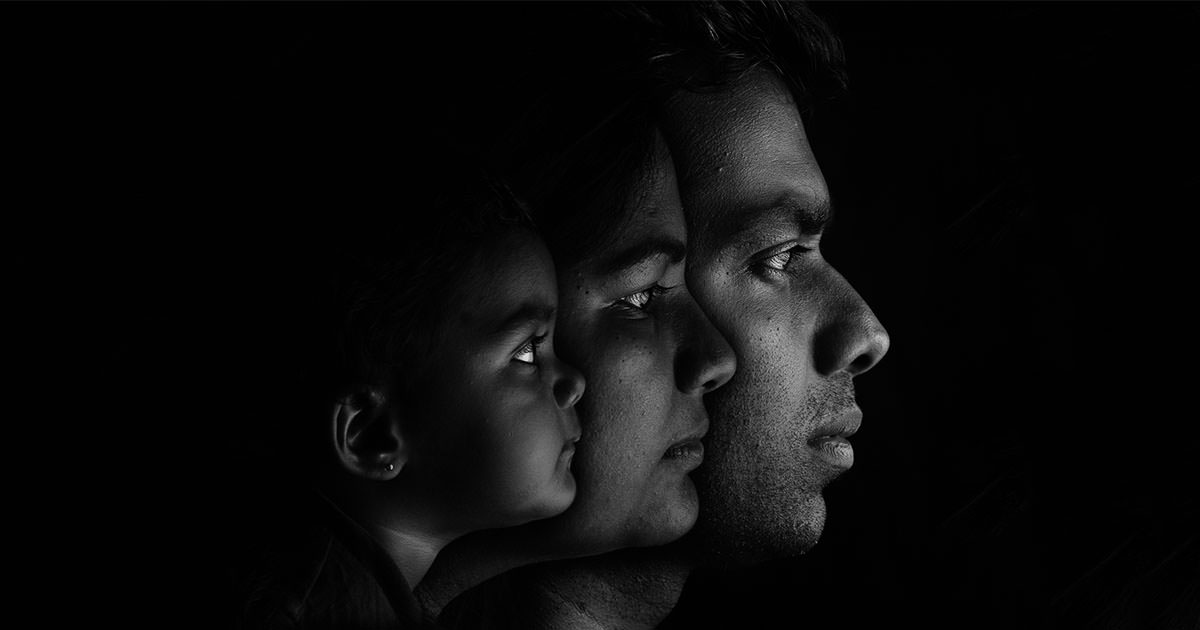
Some time back I made a composite family portrait from three headshots taken at my home studio. It started getting a lot of comments on social media. Many people asked me how it was made. In this post, I’ll try to answer all those questions. I’ll explain and show how I made this photograph right from shooting the individual headshots to making the final composite in post production.
The shoot
When I make a portrait, there is always an end result that I visualize. So, I have to execute the portrait session keeping that goal in my mind. To ensure that I get to my goal, there is a series of steps that I follow, which probably apply to every portrait I make, irrespective of it being a commissioned assignment or a personal project. This was a personal project – our family portrait with a creative twist.
Conceptualization & Planning
What is that I was trying to achieve?
I recollect seeing similar images in the past where the images had a series of objects, faces against a dark/plain background. The images were very moody, dramatic and contrasty. The attention to the form and texture of the subjects was strong as the photographs were either desaturated or were made in a ‘black and white’ medium. To achieve this, I had to ensure that I was shooting the headshots against a dark background with a low-key and dramatic light settings.
It isn’t feasible to achieve this look in a single shot. The kind of depth I wanted and the way the face had to be lit, it is better handled by making each headshot separately and then combining them into one final image. Also, having a baby as one of the subjects in such an unconventional portrait with three subjects, it becomes difficult to get everyone in the same pose.
There it is. I know I needed to shoot three identical images. I knew what treatment I wanted to give the images. Next step, was the execution of the shoot.
Location
The location for this shoot was my home studio – an extra bedroom converted into an office space where I usually work from whenever I am at home.
It was late in the evening and the ambient lighting was negligible. I used the dark side of a 5-in-1 collapsible reflector and setup the background screen for my portraits.
Equipment
The camera I used for this session was my trusted old workhorse, Canon EOS 5D Mark II (there is mark IV just out in the market). It has lasted me well all these years for weddings, editorial and portrait assignments.
Since I was trying to get headshots, I had to minimize any distortion in faces. Hence, I had to use a lens with a longer focal length. I used my go-to portrait lens – Canon EF 85mm F/1.8 lens.

I lit this entire shoot with my new Godox AD360II portable 300Ws flash. I bought it recently and I think it was the best investment I made this year. AD360II is a like a hot shoe flash on steroids. I’ll reserve another post for a detailed article on the working of this flash. For now, I would say that it is a radio controlled flash from Godox and can be wirelessly triggered by their X1T transmitters. The transmitter model for Canon is called X1T-C (I used this in this shoot) and for Nikon, it is called X1T-N. Godox has also released one for Sony cameras recently, and it is no surprise that is called as X1T-S.
Lighting

The look that I was trying to achieve for the individual headshots was getting a side profile shot. I wanted to simulate window light but with a quick spill off. Hence, I used a square softbox positioned close to the subject.
The softbox I used was a Godox collapsible 60″x60″ softbox with double baffles(diffusing screens). I have had this for a long time and have used it many times for on location assignments as modifiers for my existing hot shoe camera flashes. This softbox is attached to the flash using an S-type Speedlite bracket (available with both Elinchrom and Bowens mount) which are made by Godox too.
AD360II is a TTL enabled flash. But, I had to keep the lighting uniform for all the three headshots. Hence, to have controlled lighting I shot all of the three photographs on manual exposure and manual flash power settings.
The trickiest part of this shoot was photographing the baby – my 17 months old daughter. It took many attempts to get her looking focussed towards the light source. And I had to readjust the location and power of the flash to suit her height. This is where a portrait/bar stool with adjustable height comes handy.
Post Production
The shoot was complete. Now the next big task was culling the images, selecting the final three, and editing them to have an identical treatment. And then make the composite image, and retouch for any shortcomings from the shoot.
Editing Tools
I am a subscriber to Adobe Creative Cloud for a long time. And specifically to their Creative Cloud Photography plan which includes Lightroom CC, Photoshop CC, and Bridge. I rarely use Bridge but it is a handy tool in some cases. These three apps for photography are available to me for a monthly subscription of 499 Indian rupees which is a very affordable way to get access to legitimate copies of professional photo editing software. If I am correct, they have even better plans for students too.
Lightroom
A majority of my photo editing workflow involves Lightroom alone. Almost all the corrections to my RAW images from weddings, editorial assignments and portrait shoots are done in Lightroom. Very rarely do I use Photoshop. Photoshop steps into the scene only if I have to create composites like the way it was done in this shoot, or if there is a lot of cloning or retouching work needed to be done.

Here, in this shoot, I imported the images to my lightroom catalog, I culled through the images from the shoot by flagging, rejecting and adding stars to final images. I then zeroed in on a Black & White preset as a starting point for the edits. I used the VSCO Film preset for Kodak Tri-X 400 as the base. I then tweaked the exposure, contrast, sharpness, clarity and few other settings to get the desired look. I later synced these settings to all the three images. Next, I sent them to Photoshop for making the final composite.

Photoshop
In Photoshop, I brought each of the three images as separate layers in a single file. Since there was a little light spill during the shoot the background wasn’t pure black as the way I wanted it to be. Hence, to blend the three images effectively, I created an empty background layer and filled it with pure black color.
The blending mode of individual layers was normal mode. I added a layer mask to each layer. And then used the brush tool to reveal only parts of each layer to have a good blend as per my taste.
And there I had the composite Image I wanted.
I cropped it square, to keep the frame tight. Another reason why I cropped it square was to use it as a profile image for my accounts. The medium of publishing does matters to the final deliverable!
I then first published it in on my Instagram account and then it got reshared elsewhere on social media too.
Final Image

If you like this work, and if you want to commission me for making a portrait of yours, then please do contact me using the Contact Form. You can find more details about my portrait assignments at this link – Portrait Photography Packages.
If you like this post, then do feel free to share this with others using the sharing options given below.

- Fotobox: A Beautiful Way to Relive & Preserve Precious Moments - June 5, 2025
- SIGMA 23mm F1.4 Lens Review - September 8, 2023
- SIGMA Lens Review for Fujifilm - January 16, 2023